How to Use Camera3D#
This is a demonstration of how you can use py5 with the Processing library Camera3D.
Import Jars#
Camera3D is a Processing library, and therefore the library itself is written in Java. The library is stored in a Jar file that must be added to the Java classpath. The simplest way to do this is to use py5’s built in support for downloading Processing libraries and adding them to the classpath.
Use the py5_tools.processing.download_library() function to download and install Camera3D to the Processing library install directory. This only needs to be done once.
import py5_tools

py5_tools.processing.download_library('Camera 3D')
{'name': 'Camera 3D',
 'version': '7',
 'prettyVersion': '1.2.4',
 'downloadDate': datetime.datetime(2025, 4, 18, 11, 33, 40),
 'dir': 'Camera3D'}
Import py5#
Import the py5 library. When the library is imported the Java Virtual Machine (JVM) is started. Any additions or changes to the Java classpath must be done before importing py5.
import py5
Import Camera3D#
The following line of code will allow us to create an instance of the Camera3D class in the setup() method.
from camera3D import Camera3D
There is no actual Python package called camera3D that from camera3D import Camera3D is importing from. The reason why the previous cell works is because of some JPype import magic that is activated when py5 is imported, allowing you to import a Java class from the Camera 3D jar file.
Define Global Variables#
Define some global variables that will be used by the Sketch.
rot_x = 0
rot_y = 0
rot_z = 0
Define setup Method#
The setup method will set the frame rate and other basic setup stuff. It will also create an instance of Camera3D and set some Camera3D options.
def setup():
    py5.size(400, 400, py5.P3D)
    py5.frame_rate(30)
    py5.stroke_weight(8)
    py5.stroke(0)
    py5.no_fill()

    camera3D = Camera3D(py5.get_current_sketch())
    camera3D.setBackgroundColor(py5.color(192))
    camera3D.renderDefaultAnaglyph().setDivergence(1)
Define pre_draw Method#
The pre_draw method is a Camera3D addition that runs once before any calls to the draw method. Camera3D will call the draw method multiple times per frame. It is helpful to have the ability to have some code run only once per frame instead of multiple times. In this case, we are adjusting the rotation variables.
def pre_draw():
    global rot_x, rot_y, rot_z
    rot_x += 0.8
    rot_y += 0.3
    rot_z += 0.5
Define draw Method#
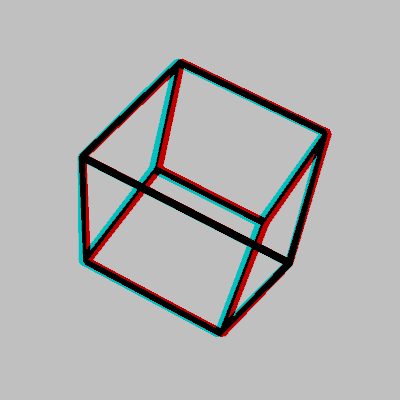
The draw method will do some transformations and draw a box.
def draw():
    py5.translate(py5.width / 2, py5.height / 2, -200)
    py5.rotate_x(py5.radians(rot_x))
    py5.rotate_y(py5.radians(rot_y))
    py5.rotate_z(py5.radians(rot_z))

    py5.box(250)
Define post_draw Method#
Similar to pre_draw, the post_draw method is run after all calls to the draw method. This post_draw method doesn’t do anything, but we will need it for reasons that will be clear later.
def post_draw():
    pass
Run the Sketch#
Run the sketch, opening a window on the display. If you are runnning this notebook locally, you will see a new window open for the running Sketch.
py5.run_sketch()
libEGL warning: egl: failed to create dri2 screen
libEGL warning: egl: failed to create dri2 screen
Here’s a screenshot, so readers of the static documentation website can understand what is happening:
py5_tools.screenshot(hook_post_draw=True)


